-
Authenticating ASP.NET 5 to AD FS OAuth Part 2: Claims
Last we looked at using the ASP.NET Identity Framework to authenticate to AD FS with OAuth2. This did simple authentication, but no claim information about the identity was known – we had a single claim for the token, and that’s all. Next, we are going to add some information about the user as a claim on the identity.
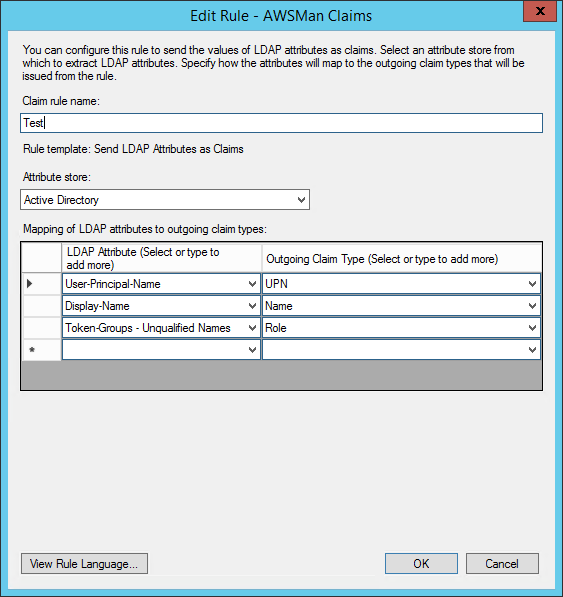
The first step, is to have AD FS send the claims that you want. This is done by configuring the Relying Party’s Claim Rules.

I’m sending three claims here – the UPN, Display Name, and “Token-Groups”. The UPN is the user principle name in Active Directory, like kjones@mycompany.org. This is used to identify the user in a unique way, like a username. The display name is used for a friendly, “Hello, Kevin” on the header of the application. The Token-Groups in this case are simply the active directory groups the user belongs to. There are three different choices. Unqualified means it’s just the name of the group, like “MyGroup”. Next is short qualified, like “mydomain\MyGroup”, and lastly there is fully qualified, like “mydomain.local\MyGroup”. I’ve opted for the unqualified, which you use is up to you, if you use them at all. You many not want to use unqualified if you have more than one domain in the forrest with a trust relationship. If there are two groups with the same name in different domains, you wouldn’t be able to tell them apart.
The outgoing claim type is the type of claim that the receiver, in this case our application, will see.
We need to get our application to handle this correctly now, which isn’t too hard. Ultimately, what AD FS does is encode all of this into a JWT. We need to handle the token as a JWT token, extract the claims, and create an identity with this information. To do so, we need to handle the
OnGetUserInformationAsyncnotification, where we are given the raw token from AD FS.options.Notifications = new OAuthAuthenticationNotifications { OnApplyRedirect = context => { /* Content omitted */ }, OnGetUserInformationAsync = context => { var token = new JwtSecurityToken(context.AccessToken); var identity = new ClaimsIdentity(token.Claims, context.Options.AuthenticationScheme, "upn", "role"); context.Principal = new ClaimsPrincipal(identity); return Task.FromResult(0); } };The
JwtSecurityTokenclass does the heavy lifting. We simply give it the tokens, and it does the rest. I’m using the one from the “System.IdentityModel.Tokens” NuGet package.We then create an identity using the claims from the JWT, then assign a new principle to the context. When constructing the ClaimsIdentity, the last two parameters are the name of the claims that contain the username and roles. If these don’t match the name of the claims, then your identity will be authenticated, but they will have no username or roles. These values must match the value of the outgoing claim when we originally set up the claim rules.
Putting it all together, we now have OAuth2 authentication with full support for claims.
-
Authenticating ASP.NET 5 to AD FS OAuth
One of the new things that Active Directory Federation Services supports starting in Windows Server 2012 R2 is OAuth2. I wanted to get ASP.NET 5 working with AD FS’s OAuth2 support (as opposed to WS-Federation or SAML).
To get this to work, we must first configure AD FS to support this. Use the AD FS management tool to ensure the OAuth2 service endpoint is enabled:

The OAuth2 specification makes no security promises by itself, instead it relies on Transport security, or TLS.
Next, you will want to ensure you have a relying party configured. If you have one that exists you want to use already, then you can use an existing one.
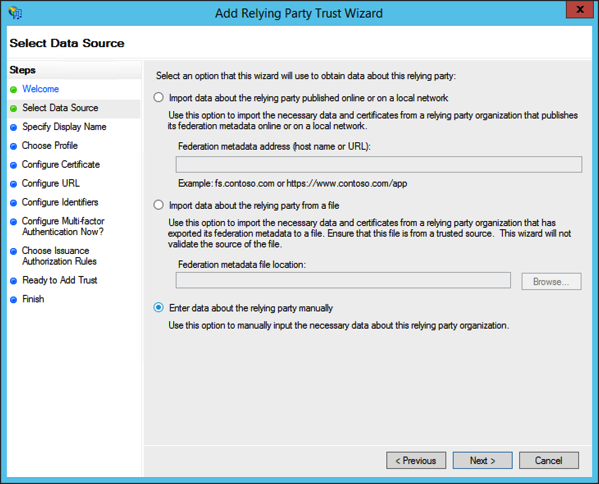
Here we can set one up quickly for testing. Start with a manual configuration:

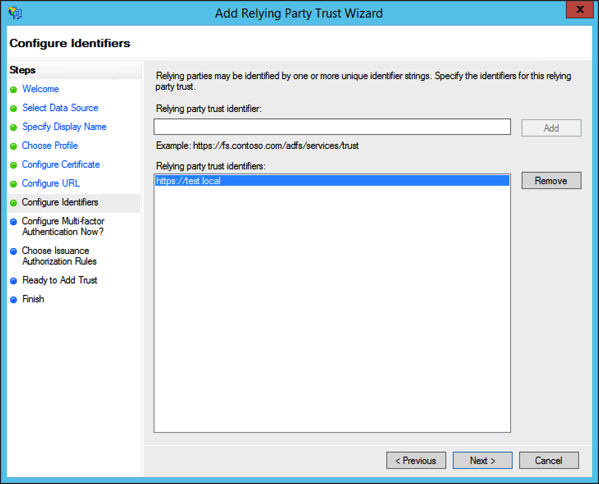
Next, specify an identifier for your relying party. This can be any valid URI, including an URN or URL. For purposes of OAuth2, this can be any URI so long as it is unique amongst all relying parties.

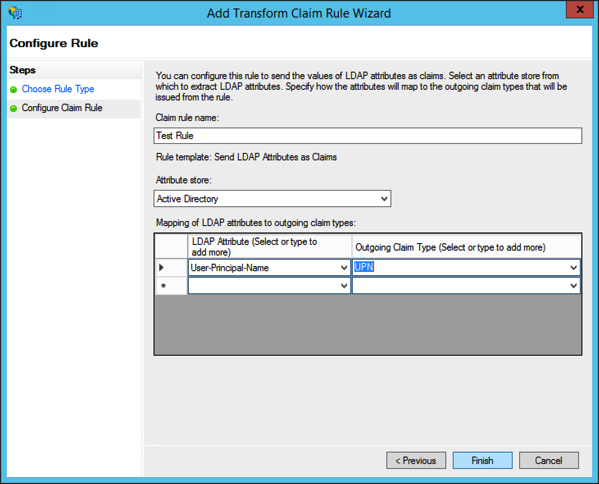
Continue through the wizard with the defaults or nothing selected since we will not be using SAML or WS-Federation, then add a claim rule for for the user principle name.

Now that you have a relying party, you use the
Add-AdfsClientpowershell cmdlet. This adds an OAuth2 client to the relying party. Each client has a unique identifier. How many clients you make per relying party is up to you – you can reuse it for many multiple applications, or make a distinct client per application.- -ClientId: This is a unique identifier that is the client ID that we will configure OAuth to use. Typically this is just a random GUID.
- -Name: The name of the client.
- -RedirectUri: This is an URI or array of URIs that AD FS is allowed to post back to. This must be a fully qualified URI.
- -Description (optional): A description of the client.
Getting into the ASP.NET 5 web application, we use the OAuth middleware, which performs the authentication. Because OAuth is just an authentication step, it must piggy-back on another authentication provider that can authenticate the entire browser session, like cookies.
Let’s say my application is being hosted on https://myserver.com/, and AD FS is located at https://adfs.mycompany.com/, and we’ll see how this ties in to the AD FS configuration.
app.UseOAuthAuthentication("oauth2", options => {
    options.AutomaticAuthentication = true;
    options.SignInScheme = CookieAuthenticationDefaults.AuthenticationScheme;
    options.ClientId = "1bf8f5f1-c3c5-4a7c-993a-01d912409915";
    options.ClientSecret = "abc123";
    options.CallbackPath = new PathString("/oauth-callback");
    options.Notifications = new OAuthAuthenticationNotifications {
        OnApplyRedirect = context => {
            var parameter = new Dictionary
            {
                ["resource"] = "https://test.local"
            };
            var query = QueryHelpers.AddQueryString(context.RedirectUri, parameter);
            context.Response.Redirect(query);
        }
    };
    options.ClaimsIssuer = "https://myserver.com/";
    options.AuthorizationEndpoint = "https://adfs.mycompany.com/adfs/oauth2/authorize/";
    options.TokenEndpoint = "https://adfs.mycompany.com/adfs/oauth2/token/";
});
The ClientId is the GUID we specified in the
Add-AdfsClientcmdlet. The ClientSecret is a meaningless value, AD FS does not support client secrets. However, the OAuth2 middleware requires it.The CallbackPath is a relative path that the middleware expects AD FS to return the OAuth token. Since our application’s callback URI is https://myserver.com/ouath-callback, this would be the URI we specify as the
-RedirectUrispecified in the powershell cmdlet.I did struggle with one thing for a bit, which was having to slightly modify the query string the ASP.NET 5 OAuth middleware used to go to the AD FS portal. AD FS expects a query string parameter of “resource” with a URI that matches one of the relying party trust URIs. The OAuth middleware allows you to intercept some events such as the redirection to the portal, handling the response back, and setting the claims up from the response.
The last step is to enable cookie authentication:
app.UseCookieAuthentication(config =>
{
    config.AutomaticAuthentication = true;
});
This is how the OAuth authentication “sticks” for the duration of the browser session.
That was enough to get OAuth2 working with ASP.NET 5 and AD FS from a pure authentication perspective. Next time we will look at setting up claims for roles and permissions.
Update
The NuGet packages needed for all of this is as following:
- “Microsoft.AspNet.Identity”: “3.0.0-beta4”
- “Microsoft.AspNet.Authentication.Cookies”: “1.0.0-beta4”
- “Microsoft.AspNet.Authentication.OAuth”: “1.0.0-beta4”
- “Microsoft.AspNet.Authentication”: “1.0.0-beta4”
- “System.IdentityModel.Tokens”: “5.0.0-beta4”
Keep in mind that given of this is beta, it’s possible some of the nuget packages needed will change, some may be removed, and others may be renamed. Finally, the namespaces used:
using Microsoft.AspNet.Builder; using Microsoft.Framework.DependencyInjection; using Microsoft.AspNet.Http; using Microsoft.AspNet.Hosting; using Microsoft.AspNet.Authentication.OAuth; using Microsoft.AspNet.WebUtilities; using Microsoft.AspNet.Authentication.Cookies; using Microsoft.AspNet.Authentication; using Microsoft.Framework.Runtime; using System.Security.Claims; using System.Threading.Tasks; using System.IdentityModel.Tokens; using Microsoft.AspNet.Authorization; -
Digging into MVC 6 – Part 1: Tag Helpers
I’ve always found some of razor’s syntax less idiomatic than I would like. HTML is a fairly ubiquitous thing amongst web developers. Whether you use ASP.NET, Symfony, Flask, ColdFusion, or WordPress, a firm grasp of HTML is required. So when I see views with this kind of markup:
@using (Html.BeginForm("Login", "Authentication"))
{
    @Html.TextBoxFor(m => m.UserName, new { @class="LoginTextBox" })
    <!-- login form contents -->
}
I can’t help but cringe a little bit. This is a far cry from HTML. The form element is a using statement, the text box for the user name uses anonymously typed objects for applying attributes to the element. It all seems a little off. If I were a designer and all I wanted to do was apply a class attribute to the form and didn’t have strong ASP.NET MVC skills, I might be at a loss.
I’d much prefer something that actually resembled HTML. HTML is, after all, what we are trying to render here. This was one of the huge benefits of MVC over web forms. With MVC, you have complete control over what HTML gets rendered. No more crazy view state, enormous element IDs, or controls that require hours and hours of overriding default behaviors to get it render the markup you want.
Tag helpers are the next step in the continuation of putting HTML back into the hands of MVC developers. Instead of all of the HTML helpers and extension methods as seen above, we can write natural HTML, and decorate them with some simple attributes that MVC recognizes. Here’s the above written as tag helpers:
<form method="post" asp-controller="Authentication" asp-action="Login">
    <input type="text" asp-for="UserName" class="LoginTextBox" />
</form>
Tag helpers let us write what we want using plain HTML. Jeff Fritz has a great blog post discussing the plumbing of tag helpers, and even how to develop your own. These are very powerful mechanisms that offer a lot of flexibility over how the final markup gets rendered.
-
Turn SSLv3 off means turn it off
A quick refresher: SSLv3 is no longer safe for use. The POODLE issue was the final nail in the coffin, but it was already starting to show several cracks.
When the POODLE issue was discovered, the reaction was swift: turn SSLv3 off. While the issue was potentially fixable (record splitting for example), getting rid of it all together was the right thing to do – very few people need it these days, and who knows what else we’ll find in the future.
Since then, a few blog posts have popped up on how to “gracefully” handle SSLv3 connections, like showing an error page, “Sorry, SSLv3 is not supported, please upgrade your browser.”
Don’t do this.
By doing that you are effectively supporting SSLv3. You have to accept the SSLv3 connection in order to show the error page. You might think, “Well I am not sending any sensitive information, just an error page, so this should be OK”.
Remember what POODLE does – an active attacker can force a browser to downgrade their connection to a weaker version of SSL during the handshake. Many browsers that that still use SSLv3 don’t support TLS_FALLBACK_SCSV, so they are still vulnerable to POODLE.
Let’s pick on Internet Explorer 7. IE 7 supports TLS 1.0 and SSLv3, but not
TLS_FALLBACK_SCSV. This person uses your website that requires authentication. Like most websites, you do authentication with a persistent or session cookie. Cookies are sent via HTTP headers by the client to the server on most HTTP requests: GET, POST, etc. That attacker then downgrades the connection to SSLv3, where they promptly see the error page that they need to upgrade their browser. But the browser sent your authentication cookie because they were already authenticated. The attacker then – with enough persistence and requests – be able to retrieve the authentication cookie.This completely defeats the point of disabling SSLv3. Turning SSLv3 off means turn it off. By not accepting the connection at all, then the client is not able to even start an HTTP request.
-
Blocking requests with HAProxy behind a load balancer
In our current infrastructure, we have three HAProxy instances behind a AWS ELB load balancer. One of the things these HAProxy instances do is tarpit (block) a list of bad IP addresses.
The configuration looked like this:
acl spamlist src -f /etc/haproxy/abusers.lst
http-request tarpit if spamlist
Turns out it didn’t work. We were still seeing a spammer get through in our logs. The reason being, the connect to HAProxy is the IP address of the load balancer – not the IP address of the client, so it would never get blocked. It did work before an ELB was part of the infrastructure. Most proxies, including ELB, support the X-Forwarded-For HTTP header. What the ELB does in this case is take the original client’s IP address and put it in that header.
We can’t just compare that header with the IP’s in the blocklist though. It is possible in some corporate environment they have their own proxy. In this case, the X-Forwarded-For becomes a comma separated list of IP addresses. So we need to check every IP address in the X-Forwarded-For header against our list.
HAProxy makes that pretty easy. You can use
hdr_ipto accomplish this:acl spamlist hdr_ip(X-Forwarded-For) -f /etc/haproxy/abusers.lst http-request tarpit if spamlisthdr_iptakes in the name of the header you want to use, and automatically handles it as a list of IP addresses.